Installing Ghost on AWS

This post shows in detail how to install the Ghost platform in the Amazon cloud and self host a blog. You will need to have an AWS account with Administrator privileges in order to follow along but this can be done with a one year free trial.
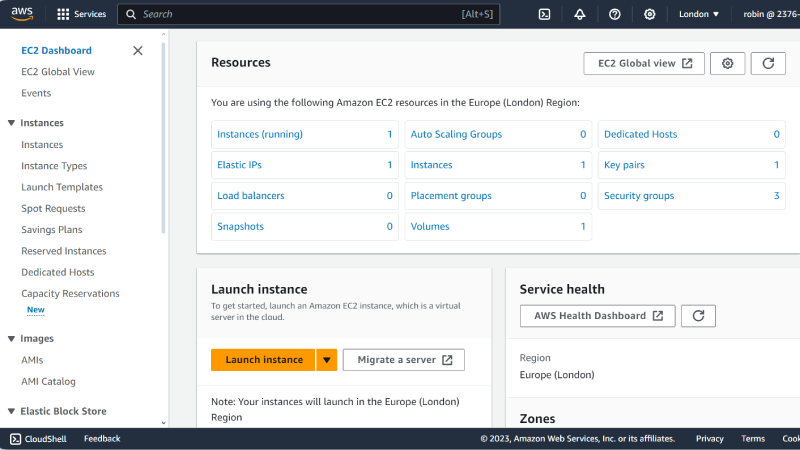
Login to AWS and access the EC2 service in order to create a virtual server. Choose the region in which you wish the server to be located. I chose London.
Select the Launch instance option. Give the new instance a name, say Ghost Server, and then scroll down and select the Ubuntu 22.04 image. Later images of Ubuntu are not yet supported.
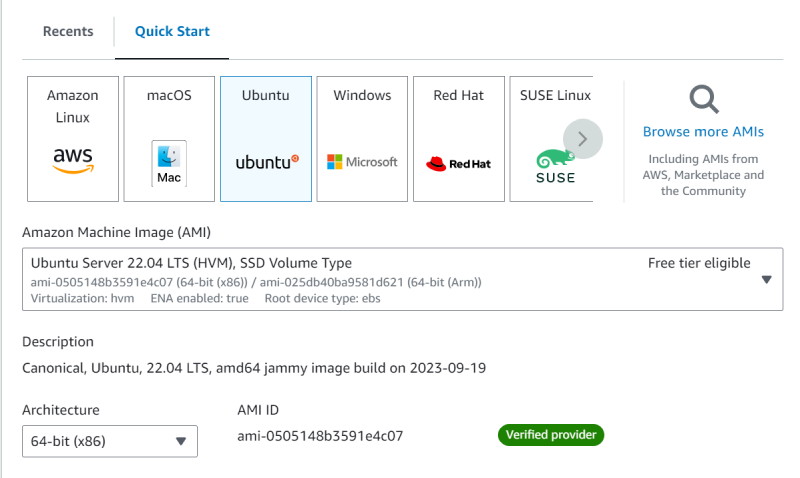
You can see that the Ubuntu server is Free tier eligible which allows you to test AWS and your self hosted Ghost setup for up to a year.
Scroll down further and select the Create new key pair link. Within the popup window, enter a name for your key pair such as Ghost-Key-Pair and then select the Create key pair button. Be sure to download the private key file to your computer. This file will be required to access your server so keep it safe.
Scroll down further and select your security group settings. Keep the Create security group default. Keep the Allow SSH traffic from default but optionally change the Anywhere setting to My IP for additional security. Select Allow HTTPS traffic from the internet and Allow HTTP traffic from the internet to enable Ghost to serve http(s) traffic. Bear in mind that even if you don't require http access for reading your blogs, it is still required for automatic update of your SSL certificate.

Scroll down to the Configure Storage section. Free tier eligible customers can get up to 30 GB of EBS General Purpose (SSD) or Magnetic storage. Change the storage from the default 8 to 30 GiB. Other configurations would be possible such as an 8 GiB root volume and an additional 22 GiB encrypted volume.
The Ghost.org website details here the software to install prior to installing Ghost itself. This includes NGINX, MySQL and Node.js. This process can be automated using a script provided below.
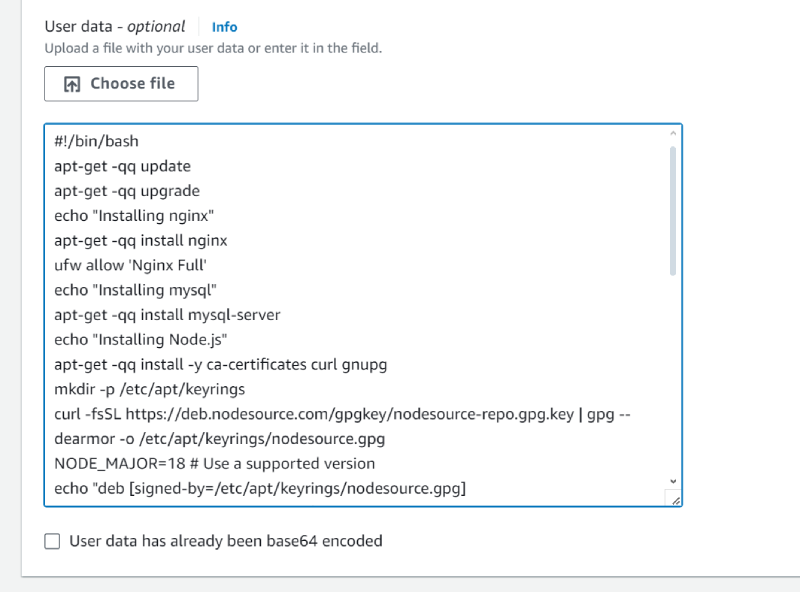
Scroll down and open the Advanced details section. Within the section, find the User data (optional) text area. This field can be populated with commands that need to be executed only once by the new server instance. For example, new applications can be loaded. The commands will run with root access so no sudo command is required.
I have created a file below that you can download to your client computer and then upload into the User data field within AWS. The file will install a swap directory (which is required), the prerequisite software, the Ghost CLI and also two bash scripts in the /home/ubuntu directory.
Once you have uploaded the commands into the User data (optional) text area, select the Launch instance button and your virtual linux server will be created and launched.

Now that we have a running instance, we can associate an elastic IP address with the running instance. This is a public IP address. You can now connect to the instance using ssh.
ssh ubuntu@[ip address] -i c:\Users\Robin\.ssh\Ghost-Key-Pair.pemCheck the log in /var/log/cloud-init-output.log to ensure the commands executed properly. It may take five minutes for the script to complete.
You need to own a domain name to point to your public IP address. Once you have a correctly configured domain name, you will be in a position to fully install Ghost.
Set password for root access to mySQL and create installation directory for ghost
Change directory to /home/ubuntu and run the setmysqlpassword.sh script. The script will prompt for a password and will set this password as the root password for mySQL. Store this password securely as it will be required when you install ghost below. The script will also prompt for the ghost installation directory. It will create the directory and configure the access.
cd
./setmysqlpassword.sh
Install Tailscale VPN (optional)
Tailscale is a VPN that will provide ssh access to the server. It can also use the server as an exit node. To install Tailscale, run the installtailscale.sh script.
cd
./installtailscale.sh
Run the install process
Now we install Ghost as follows.
cd /var/www/<Ghost Installation Directory>
ghost install
Install questions
During install, the CLI will ask a number of questions to configure your site.
Blog URL
Enter the exact URL your publication will be available at and include the protocol for HTTP or HTTPS. For example, https://example.com. If you use HTTPS, Ghost-CLI will offer to set up SSL for you. Using IP addresses will cause errors.
MySQL hostname
This determines where your MySQL database can be accessed from. Since MySQL is installed on the same server, use localhost (press Enter to use the default value).
MySQL username / password
Enter root as the username and then supply the password that you entered earlier.
Ghost database name
Enter the name of your database. Use the default name unless you have multiple databases. It will be automatically set up for you.
Set up a ghost MySQL user? (Recommended)
Since you provided your root MySQL user, Ghost-CLI can create a custom MySQL user that can only access/edit your new Ghost database and nothing else.
Set up NGINX? (Recommended)
Sets NGINX up automatically enabling your site to be viewed by the outside world. Setting up NGINX manually is possible, but why would you choose a hard life?
Set up SSL? (Recommended)
If you used an https Blog URL and have already pointed your domain to the right place, Ghost-CLI can automatically set up SSL for you using Let’s Encrypt. Alternatively you do this later by running ghost setup ssl at any time. You will need http access to your server for the SSL setup to work.
SSL certification setup requires an email address so that you can be kept informed if there is any issue with your certificate, including during renewal.
Set up systemd? (Recommended)
systemd is the recommended process manager tool to keep Ghost running smoothly. We recommend choosing yes but it’s possible to set up your own process management.
Start Ghost?
Choosing yes runs Ghost, and makes your site work. Use the URL below (substituted with your domain name) to set up your site.
https://example.com/ghost